Showing posts with label Main course. Show all posts

Wednesday, 9 July 2014

EASIEST KALE SALAD

This post is for the beautiful free spirit from whom I learned this recipe and from whom I received the grace and shakti to create this blog. This preparation is made using only three ingredients and hence you are able to truly enjoy the raw bitter flavours of kale and the sweet heavy flavours of olive oil. It is always a bit difficult to include the bitter taste in your diet and kale offers a very healthy, convenient option. The method of preparation gives you an opportunity to truly become one with this super green leaf vegetable and to pour your love into it. Being a green leaf vegetable, kale has high contamination of pesticides and therefore should preferably be bought organic. And even better option is - growing at home if possible.

Kale from the garden:

It is a magical experience to see the interplay of forms when you grow your own vegetables. My house mate bought a worm farm a few months ago. We fed an old shirt to the worms. The worms ate it and provided us with compost and 'worm tea'. We used some of this compost and worm tea to grow the vegetables in the garden which we would consume eventually. Essentially, some element of that shirt will become a part of my body. I will go on for a few years, die and eventually return to the Earth. May be to nourish the soil for the purpose of growing cotton to be used for making shirts. How beautiful is the leela of consciousness and form, Shiva and Shakti. I wonder if every atom (or quark?) carries the memory of its experiences?

General health information: Kale is high in Vitamin K and antioxidants which helps reduce the risk of cancer, is high in Vitamin A which is good for your vision and skin and is high also in Vitamin C which boosts your immune system. It is low in calories, lowers cholesterol levels, has zero fat and its high fibre content is good for elimination. Kale is also very high in iron and calcium and is detoxifying, cleansing and anti-inflammatory.

Kale has achieved a 'celebrity' status and is especially popular among the yuppie health fanatics who rave about their kale smoothies and kale salads. My opinion – don't consume kale in excess, just like anything else. It is a very healthy, green leaf vegetable but it is not the only one. I have had a dozen other green leaf vegetables and did not even know kale existed when I lived in India. So, eat kale, but don't overdo it – just like anything else.

Ayurvedic information:
Dosha information:
Kale: V↑P↓K↓
Olive Oil: V↓P↓K↑
Lemon: V↓P↑K↓
Rasa (primary tastes): Bitter, Astringent, Sweet, Sour
Virya: Cooling
Vipaka (post digestive effect): Pungent and Sweet
Kale is dark green and bitter with high Vata, olive oil is heavy, sweet and oily with high Kapha and lemon is sour and sharp with high Pitta. So, these three ingredients balance each other nicely. Kale grows well mainly in winter and spring. This preparation is more suitable in spring. In winter, Vata is strong and hence it is not advisable for Vatas and Kaphas to eat raw kale in winter. But if you have a strong desire to eat raw kale in winter, make sure you eat it at noon when agni is the strongest. Preferably use tender leaves of kale and chop these into smaller pieces to aid digestion. Maybe, have a spice tea between breakfast and lunch to kindle the agni. And don't forget the lemon which will also help in digestion.


Preparation time: 20 minutes
Difficulty: Easy
Type: Main course
Serves: 2
Vegan: Yes

Ingredients:
1 bunch kale
6 tbsp olive oil
1 lemon

Preparation:
  1. Shear the leaves of kale from the stalks using a knife and become aware of the sound the knife makes as it runs through the leaf. The stalks are not used in this preparation and I usually compost them. But apparently, the stalks are very high in nutritional value and many people store them for later. You can steam them and garnish with salt and pepper.
  2. Put all the sheared leaves in a wide bowl and pour the olive oil on it generously without any hesitation whatsoever. Ever seen the Turkish oil wrestlers? Did you notice how generously they pour the olive oil on their bodies? Just like that, pour the olive oil over the sheared kale leaves.
  3. Now close your eyes and begin the sadhana of giving a deep tissue massage to the kale. It should be very deep to ensure that every single bit of kale is covered in oil. Soon the kale will emit a wonderful raw earthy scent. Inhale it and enjoy this experience. Feel the olive oil and the kale against your palms as you massage it thoroughly. Continue this for at least 15 minutes. At the end of it, a bowl full of kale will be reduced to almost a third of its size.
  4. Squeeze fresh lemon juice for taste and enjoy!
Notes:
  1. Once you are done massaging the kale, you would want to wash your hands to get the oil off your hands. After I am done with the preparation, I usually keep rubbing it on my palms and the back of my hands till the skin absorbs most of the oil. And when the skin is not absorbing any more oil, I wash my hands. This way you can avoid waste and at the same time keep your skin healthy and glowing.
  2. Please refer my post Getting Started With Ayurveda for understanding of Ayurvedic terms and concepts.

Friday, 21 March 2014

ABOUT KOSHIMBIRS


In this post, I will write the recipe for pumpkin koshimbir as an example but the intent is to let you know the concept of koshimbir so that you can make your own different varieties of koshimbirs. Since this preparation can be made with various different vegetables, this post will not have any specific health or Ayurvedic information about the ingredients.

The word 'koshimbir' has typical, simple, Marathi, middle class written all over it. A Maharashtrian thali is incomplete without a koshimbir. I refuse to call it raita because it is different from it. Raita can be called the north Indian cousin of koshimbir and a somewhat distant second cousin who lives in Greece is Tzatziki. It is a very simple, quick and yet a tasty and wholesome preparation and usually acts as a side dish with the main meal.

Usually, a koshimbir will have four components:
  1. a grated raw vegetable but some vegetables taste better in koshimbir if cooked
  2. yoghurt/curd
  3. ground roasted peanuts or desicated coconut
  4. chaunk
Keeping the yoghurt and chaunk constant, you can try many different combinations with vegetables, cooked or uncooked and use various other ground nuts like sunflower seeds, pumpkin seeds, almonds etc.

Preparation time: 10 minutes
Cooking time: 5 minutes
Difficulty: Easy
Type: Main Course
Serves: 2
Vegan: No

Ingredients:
2 cups cubes of pumpkin/butternut pumpkin
2 tbsp curd/yoghurt
1 tbsp chopped coriander
2 tbsp desicated coconut
½ tbsp ghee/oil
½ tsp asatoetida
1 tsp mustard seeds
8 curry leaves
1 medium sized dry red chilli
Himalayan/Rock salt for taste

Preparation:
  1. Peel the skin of the pumpkin. To some, it is a tedious task but it is a wonderful food sadhana and do it with complete awareness. Feel the pressure it requires for you to cut through the pumpkin skin, listen to the sound the knife makes as it cuts through the pumpkin. Inhale the scent as more and more surface area of the pumpkin gets exposed. Use the senses to heighten your awareness. Once it is peeled, cut the pumpkin into small cubes. Cook these cubes in a pressure cooker or in a sauce pan. The cubes should be soft but must retain the shape.
  2. Take these cubes in a bowl and add the yoghurt, desicated coconut, coriander and salt and mix well. Keep this mixture aside.
  3. Now, we prepare the chaunk. For this dish, instead of adding the main ingredients in the chaunk (which is usually the case), we add the chaunk to the main ingredients. Take the ghee/oil in a stainless steel ladle and heat it over low to medium heat. Add mustard seeds and wait for them to finish popping. Then add asafoetida, curry leaves and the chilli (in that order).
  4. Now pour this chaunk into the mixture in Step 2, listen to the sizzling sounds and mix well. Traditional Maharashtrian koshimbir is ready.
Pitfalls:
When you heat the ghee/ oil before putting in the chaunk ingredients, make sure that it is not too hot. If the ghee/ oil overheats, first of all its composition will change chemically which is not good for health. Secondly, it will destroy the flavour and potency of the ingredients. So, it is better to start with low heat, add 2-3 mustard seeds to test and increase the heat, if required. If the ghee/ oil starts smoking and the ingredients turn dark brown or black, then the ghee/ oil and the ingredients have been damaged.

Notes:
  1. Many people add sugar to koshimbirs but I do not as all my preparations are sugar free. If you want to make it sweet, add honey but in that case, use oil in the koshimbir instead of ghee. According to Ayurveda, mixing equal amount of ghee and honey is an incompatible food combination and hence I usually avoid mixing these even when not in equal proportions just to be safe.
  2. Please refer my post Getting Started With Ayurveda for understanding of Ayurvedic terms and concepts.
Variations:
The most popular koshimbir is made using cucumber and ground roasted peanuts. Other common koshimbirs are made out of carrot and beet (cooked). One can even try parsley instead of coriander. But as stated above in the introduction, one can try many different combinations keeping the yoghurt and chaunk constant.

Tuesday, 4 February 2014

PEETH PERUN DHABBU MIRCHI (CHICKPEA FLOUR CAPSICUM SUBJI)


This is another very typical Maharashrian home made preparation which you will never find in restaurants. This yummy and savoury dish consists of capsicum stir fried in flavours of mustard seeds or cumin or fennel seeds mixed with partially crispy chick pea flour and ground coriander seeds. Capsicum or Bell Peppers or Sweet Peppers are available almost everywhere across the globe and the preparation is quick, easy and simple. While buying capsicum, make sure that the skin is firm and taut and that there are no spots on the skin. Buy it organic because capsicum is one of the dirty dozen. “Peeth perun Dhabbu Mirchi” literally means “planting chick pea flour in capsicum”. This dish is one of my favourites because it tastes so good and is very simple in preparation.

General health information: Capsicum is a very good source of Vitamin A and Vitamin C and therefore very high in antioxidants. It is low in saturated fat, very low in cholesterol and sodium and therefore it is used for heart and blood vessels related conditions like high cholesterol, poor circulation, excessive blood clotting and preventing heart disease. Capsicum speeds up the metabolism and helps burn more calories. It also improves digestion by increasing stomach secretions and is used for various digestion related problems including upset stomach, intestinal gas, stomach pain, diarrhoea and cramps.

Chickpea flour also, like capsicum, is low in saturated fat and very low in cholesterol and sodium. It is rich in minerals like Magnesium, Copper, iron and phosphorus. It is also high in dietary fibre, protein and folate. Also, due to its slow glycemic index, it is a recommended food for diabetics.
Ayurvedic information:
Dosha information: V↑P↑K↓
Rasa (primary tastes): Sweet, Astringent, Pungent, Salty
Virya: Heating
Vipaka (post digestive effect): Pungent/Sour

The ayurvedic fraternity seems to be divided on whether capsicum aggravates or pacifies Pitta. However, I feel that most of them are inclined towards the view that it aggravates Pitta. Similar is the case with rasa. Some say that capsicum is sweet and pungent while others say that it is astringent and pungent.

Capsicum is a member of the night shade family. (Other common night shades being potatoes, tomatoes, chillies and aubergines – I know – all the yummy ones!) Night shades are usually avoided in Ayurveda and many believe that they are aggravating for all three doshas. They possess inflammatory properties especially relating to joints. Some say that for people suffering from arthritis or other types of pain and inflammation, it is advisable to avoid them altogether. But then again, there are 'pro nightshades supporters' who do not believe that they cause inflammation or pain in people suffering from arthritis. So, in my opinion, it is best to keep observing the reactions of your body to night shades in the short term and the long term and accordingly adjust its inclusion in your diet. Committed yoga practitioners should definitely avoid it because of its aggravating qualities.

This preparation aggravates Vata and Pitta. It should be ideally combined with fresh flat bread made out of wheat, rice or sorghum (jowar). The high Kapha dosha in these breads will balance the high Vata dosha (in Capsicum and Chick pea flour) and the Pitta dosha (in Capsicum). Flat breads made from these grains will also add the sweet taste to your meal.

Preparation time: 10 minutes
Cooking time: 20 minutes
Difficulty: Easy
Type: Main course
Serves: 2
Vegan: Yes

Ingredients:
3 medium sized green capsicum/bell peppers
2 tbsp ghee/oil (vegans should use oil)
2 tsp mustard seeds
½ tsp asafoetida/ hing
¾ cup chickpea flour
2 tsp coriander powder
2 tsp cumin powder
½ tsp turmeric powder
1 tsp ajwain
Rock/Himalayan Salt to taste

Optional:
Coriander/Parsley for garnishing (not optional for Pitta individuals)

Preparation:
  1. Prepare a mixture of the chickpea flour, coriander powder, cumin powder and ajwain and keep aside.
  2. Cut the capsicum into squares of medium size and listen to the crisp sounds of the knife cutting through the fresh, firm and stiff skin capsicum. Remove the seeds.
  3. And now? – the usual – preparation of the chaunk! Take ghee/oil in pan and heat it over low to medium heat. Add the mustard seeds and listen to the sweet melody of the popping seeds. Once they stop popping add the asafoetida and let it fry for a few seconds. Oh that intoxicating aroma of asafoetida is ever present in the air near lunch time in any Indian household. Either it comes from your own house, or your neighbors.
  4. Now add the pieces of capsicum, salt and turmeric and stir well making sure that the flavours of the chaunk coat the capsicum. Cover the pan with a steel plate and fill the plate with some water. Check it occasionally till the capsicum is half cooked.
  5. Add the mixture of chickpea flour, one tbsp at a time. Stir well, add another tbsp so on and so forth. Keep stirring the mixture to ensure that the chickpea floor does not stick. A little bit will stick anyways which is alright. Keep scraping it using a spoon. Usually, the water released by the capsicum is enough to keep the chickpea flour moist. But if not, you can sprinkle little water. But be careful not to add too much. Otherwise, the texture of the chickpea flour will be like a paste. That is not how it should be like for this dish. It should be crispy, dryish and granular as you see in the picture. Once, the chickpea flour turns golden brown and crispy, the dish is ready. Serve with traditional Indian flat bread.
Pitfalls: 
  1. The chickpea flour must be added one tbsp at a time. If you add the whole lot at once, it may form big lumps. 
  2. When you heat the ghee/oil before putting in the mustard seeds and asafoetida, make sure that the ghee/oil is not too hot. If the ghee/oil overheats, first of all its composition will change chemically which is not good for health. Secondly, it will destroy the flavour and potency of the mustard seeds and asafoetida. So, it is better to start with low heat, add 2-3 mustard seeds to test the ghee/oil and increase the heat, if required. If the oil starts smoking and the mustard seeds pop too quickly, then the oil and mustard seeds have been damaged. Ideally, the mustard seeds will sizzle for 10-15 seconds and then pop for 30-35 seconds
Notes: 
  1. In the West, you can find chickpea flour in any Indian store. It may also be titled as “Besan”. It is made from black chickpeas which I have rarely come across in Western super markets. 
  2. Individuals with Pitta constitution should use Coriander as garnishing to counter the Pitta aggravation caused by Capsicum. 
  3. Remember – ALWAYS use ajwain when preparing any dish containing chick pea flour. Chick pea is denser than other lentils and therefore, relatively harder to digest for people with sensitive digestive systems. This problem can be dealt with by using ajwain which greatly helps in digestion.
  4. Please refer my post Getting Started With Ayurveda for understanding of Ayurvedic terms and concepts.
Variations: 
  1. Instead of mustard seeds, you can use cumin seeds or fennel seeds to change the flavour. If you use cumin seeds, skip the cumin powder and increase the quantity of coriander powder by two tsp.
  2. If you want to take this recipe to another level using a very simple addition, sprinkle two tea spoons of fennel seeds powder just before serving and mix well. My sister in law gave this advice to me and the dish smells and tastes so much better.
  3. This dish can also be prepared using the green part of spring onions which most people in the waste throw away. Chop the green bit of the spring onion into quarter inch long pieces. Recipe is exactly the same except that the chickpea texture in this recipe should be like a paste unlike the crispy texture mentioned in the above recipe. This can be achieved by adding more oil.

Thursday, 9 January 2014

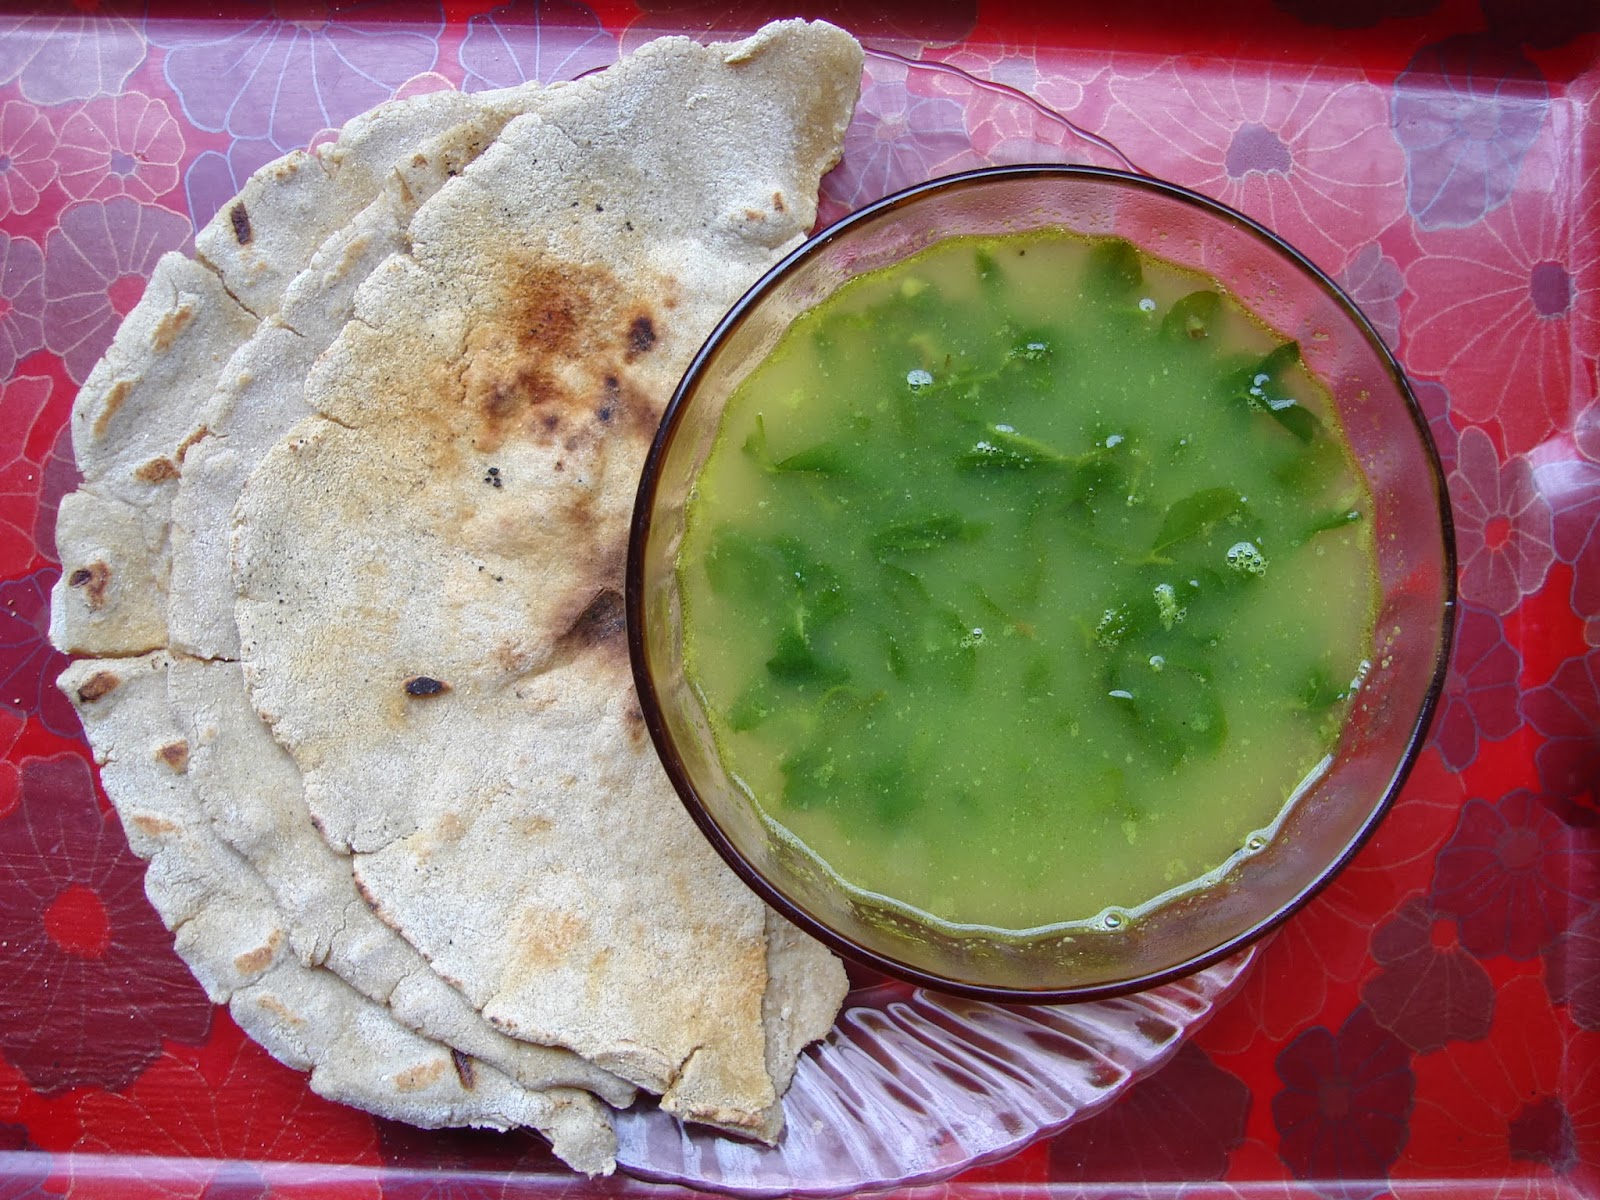
THE MAGIC POTION - METHICHE PAANI (FENUGREEK WATER)


This preparation comes from my native place, Khandesh and I was surprised that no information is available on the internet about this truly magical concoction. The intoxicating aroma and delightfully bitter taste of fresh Fenugreek prepared using the most basic of spices in combination with traditional flat Indian bread makes it a very simple yet extremely healthy dish. Although Fenugreek has innumerable health benefits, it should be used cautiously because of its potency.

Fenugreek (fresh, dried and seeds) is used commonly in various recipes across Asia, Middle East, North Africa and India. India being the largest producer of Fenugreek, this vegetable is easily available in markets across the country in its fresh form. In the West, I have never seen it sold in any of the supermarkets in its fresh form. Perhaps, the best source is Indian stores where they sell Indian vegetables or open markets. If not, it can be easily grown. I remember my parents used to grow Fenugreek when they used to visit my brother in U.S. And I myself, am currently growing some of my own. Get two one foot X one foot trays. Fill one tray with soil and scatter some fenugreek seeds randomly on the soil. Water regularly. It is unbelievable how quickly it grows. It is unbelievable to see what earth, water, fire and air can do. After two weeks, do the same with the other tray and this way you can stagger the growth of your fenugreek leaves.


General health information: As regards nutritional information, Fenugreek leaves are very rich in vitamins and minerals. Primary ingredients include calcium, potassium, phosphorus, iron and dietary fibre. It also contains vitamin C and vitamin K. Fenugreek leaves are truly a wonder herb with a vast range of health benefits some of which are:
  1. It is especially used in women’s health as it decreases uneasiness and menstrual cramps associated with PMS, reduces mood fluctuations during menopause and PMS, induces labour and eases child birth, treats hormonal disorders, helps with breast enlargement and increases breast milk production.
  2. Fenugreek is also used in many traditional hair products. It helps make your hair shiny and also keeps dandruff away. It also offers remedies against hair fall or thin hair. It is used in beauty products and helps to cure skin problems (wounds, rashes and boils) and improve skin complexion.
  3. This wonder herb is full of antioxidants and works as a mucus solvent thus providing relief from respiratory disorders like asthma, bronchitis, sinusitis, tuberculosis, cough, cold, pneumonia and sore throat.
  4. In recent research Fenugreek has been found to have anti-carcinogenic properties and effectively control liver cancer and prevents colon cancer.
  5. Fenugreek aids in lowering cholesterol, has cardiovascular benefits and lowers the risk of heart attack.
  6. Fenugreek acts as a very important part of diabetic diet and may be an effective treatment for both type 1 and 2 diabetes.
  7. Apart from the above, Fenugreek is also used to treat arthritis and rheumatism, cure fevers, improve digestion, cure constipation, increase libido and cure anaemia
Ayurvedic information:
Dosha information: V↓P↑K↓
Rasa (primary tastes): Bitter, Salty
Virya: Heating
Vipaka (post digestive effect): Pungent

This preparation aggravates Pitta. It should be ideally combined with fresh flat bread made out of wheat, rice or sorghum (jowar). The high Kapha dosha in these breads will balance the high Pitta dosha in Fenugreek. Flat breads made from these grains will also add the sweet taste to your meal.

Preparation time: 25 minutes
Cooking time: 15 minutes
Difficulty: Easy
Type: Main course
Serves: 2-3
Vegan: Yes

Ingredients:
1 bunch fresh Fenugreek (2-3 cups)
2 tbsp split peeled moong daal (split, peeled green gram)
1 tbsp ghee/oil (vegans should use oil)
2 tsp mustard seeds
½ inch ginger finely chopped
½ tsp asafoetida/ hing
½ tsp turmeric powder
Rock/Himalayan Salt to taste

Preparation:
  1. Soak the moong daal for 3-4 hours before the preparation. Take the soaked moong daal in a pan, add water twice the quantity of the moong daal and keep it on high heat till the water starts boiling. Once the water starts boiling, turn the heat to medium and cover the pan partially till the moong daal cooks – which should be 12-15 minutes. Always keep an eye on the pot as sometimes it may just overflow. Perfectly cooked moong daal is where the shape of the daal is intact but it is soft and you can chew it without any effort at all. Alternatively, you can use a pressure cooker. The proportions of the moong daal and water remain the same if you are using a pressure cooker. In case of pressure cooker, you keep it on high heat and switch it off after the steam is released 7-8 times. Although, this may vary a bit depending upon the size of the cooker, the make, the quality of the moong daal and the supply of heat. The water may be completely or partially absorbed by the daal. If some water remains, do not drain it away. Once cooked, keep aside.
  2. While the moong daal is getting cooked on the flame, pick the Fenugreek leaves. Fresh Fenugreek is available in markets in a bunch. In India, many vegetable vendors or hawkers offer fresh Fenugreek leaves which have been already picked from the stalks. Do not buy such Fenugreek where the leaves have been picked because separating leaves from the stalk and keeping them for extended period (more than an hour) in a plastic bag results into speedy loss of prana. The stalks keep the leaves nourished and fresh for a longer time. Besides, if you buy picked Fenugreek leaves, you are deprived of one of the most wonderful sadhanas – the sadhana of picking the fenugreek leaves from the stalks. Usually in India, a Fenugreek bunch will have a lot of soil sticking to its roots. Besides, the stalks are not used in cooking and so this involves an unavoidable task of picking hundreds of small Fenugreek leaves from the stalk. To many, this is a boring task. But it is meditative if you combine it with mantra sadhana. Each leaf or a bunch of three (usually you have three leaves at the end of every stalk) needs to be picked from the hundreds of stalks contained in a bunch. Every time you pick one leaf or a bunch of three, you repeat your mantra and that way you bless each and every leaf. Do this with complete awareness. Which other vegetable offers you the opportunity of blessing the food at such a micro level and such one pointedness of mind? I feel this helps you strengthen your relationship with food. So, the first step in the preparation is sitting down in a comfortable place, picking the Fenugreek leaves from the stalks and repeating your mantra every time you pick a leaf with one pointed focus. Once this is done clean the leaves properly under running water and keep aside. You do not need to chop the leaves.
  3. Take ghee/oil in pan and heat it over low to medium heat. Add the mustard seeds and wait for them to stop popping. Now add the chopped ginger and fry for a while taking care that the ginger does not turn brown or burn. Finally add the asafoetida. The flavours are ready!
  4. Add the cooked moong daal, Fenugreek leaves, turmeric and salt. Stir well and let the flavours seep into the Fenugreek and the moong daal for 3-4 minutes.
  5. Now add water. The name of the dish is Fenugreek Water. So, make sure that the texture is a bit watery but not too watery. It should be somewhere between medium thick and watery. Let it simmer on low heat for a while. Stir once in a while so that the Fenugreek does not clump together and enjoy the wonderful aroma of Fenugreek. Take it off the heat and enjoy with any traditional Indian flat bread.
Pitfalls:
When you heat the ghee/ oil before putting in the mustard seeds, ginger and asafoetida make sure that it is not too hot. If the ghee/ oil overheats, first of all its composition will change chemically which is not good for health. Secondly, it will destroy the flavour and potency of the ingredients. So, it is better to start with low heat, add 2-3 mustard seeds to test and increase the heat, if required. If the ghee/ oil starts smoking and the ingredients turn dark brown or black, then the ghee/ oil and the ingredients have been damaged.

Notes:
  1. For best taste: Crush the flat bread into medium sized crumbs. Pour the Fenugreek water over it. Mix using the tips of your fingers and feel its texture and warmth. Eat using your fingertips – mmmm, finger licking good!!
  2. Please refer my post Getting Started With Ayurveda for understanding of Ayurvedic terms and concepts.
Variations:The original recipe is without the moong daal. However, I thought that adding a tridoshic moong dal would balance out the dish to some extent and also add some body to it.